ShopDreamUp AI ArtDreamUp
Deviation Actions

This Journal is more informative.
I believe it's time I delve into my process of conjuring up nonsense, rather than say nonsense here. But then again, when did I ever write things that make sense?
It's been 8 months! Man I feel old.
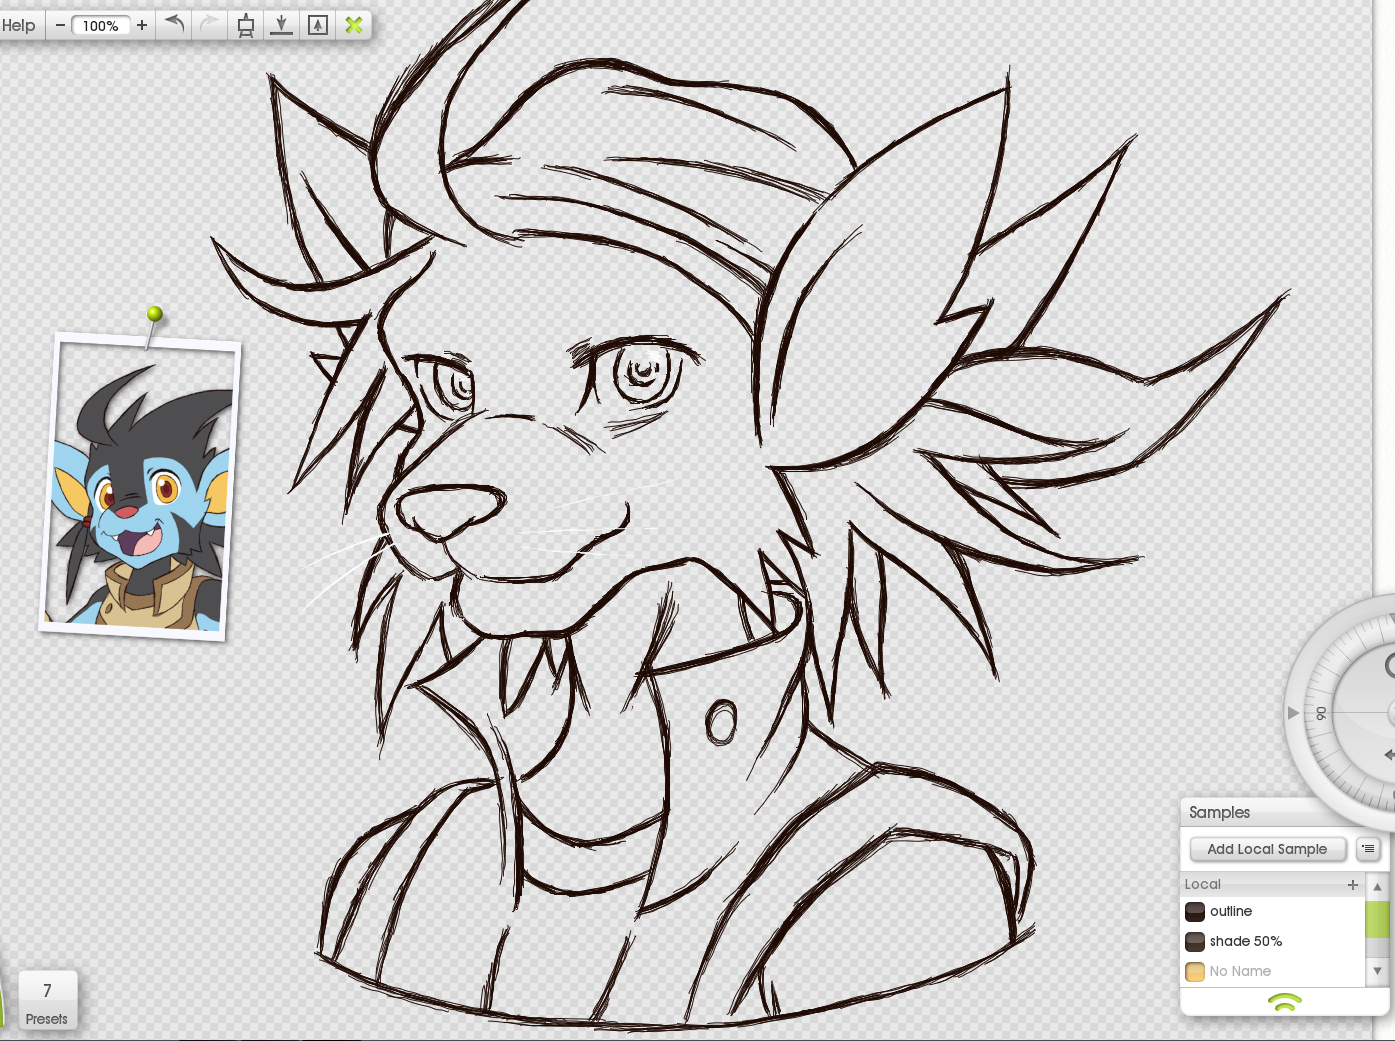
1. The first step revolves around getting a sketch done.
Measure this, get that right, rub that out, edit this line in - the list goes on.
This means getting the basic outlines and where everything vaguely sits on the picture.
Shades are optional, but if you have future sight, it's best to line out where the light hits. Knowing myself, I would say I am 'good' enough (Unless I am drawing something that resembles a GUNDAM GEEZUS HAVE YOU TRIED DRAWING ONE OF THOSE?!)
Things to remember - don't bother making this part perfect. If you plan to make this a sketch, by all means, beautify it.
Digitizing on the other hand, it's best to keep it to lines and simple hatchings for shades. Tracing a 75% complete work is not very fun.

2. The second step deals with... you got it; outlines.
What? Some of the lines are missing? Scoff I say! Scoff!
True, I used to outline EVERYTHING imaginable, but that is called being lazy. Colours can also formulate outlines too!
Compare the Rai(mundo) on the left. I did leave the fur untraced, but most of the lines are visible. While this gives a non-coloured piece a nice touch, adding colour in makes some lines unnecessary! I am very guilty of this (because it also saves time") )
)
Iris shine and minor details such as whiskers (he has them now, like a real cat) can be slapped on, and you don't need to adjust them until the very end, so disable the visibility.
Things to remember - some lines require thinking in terms of volume. I forgot the rest of the sentence. Sorry.
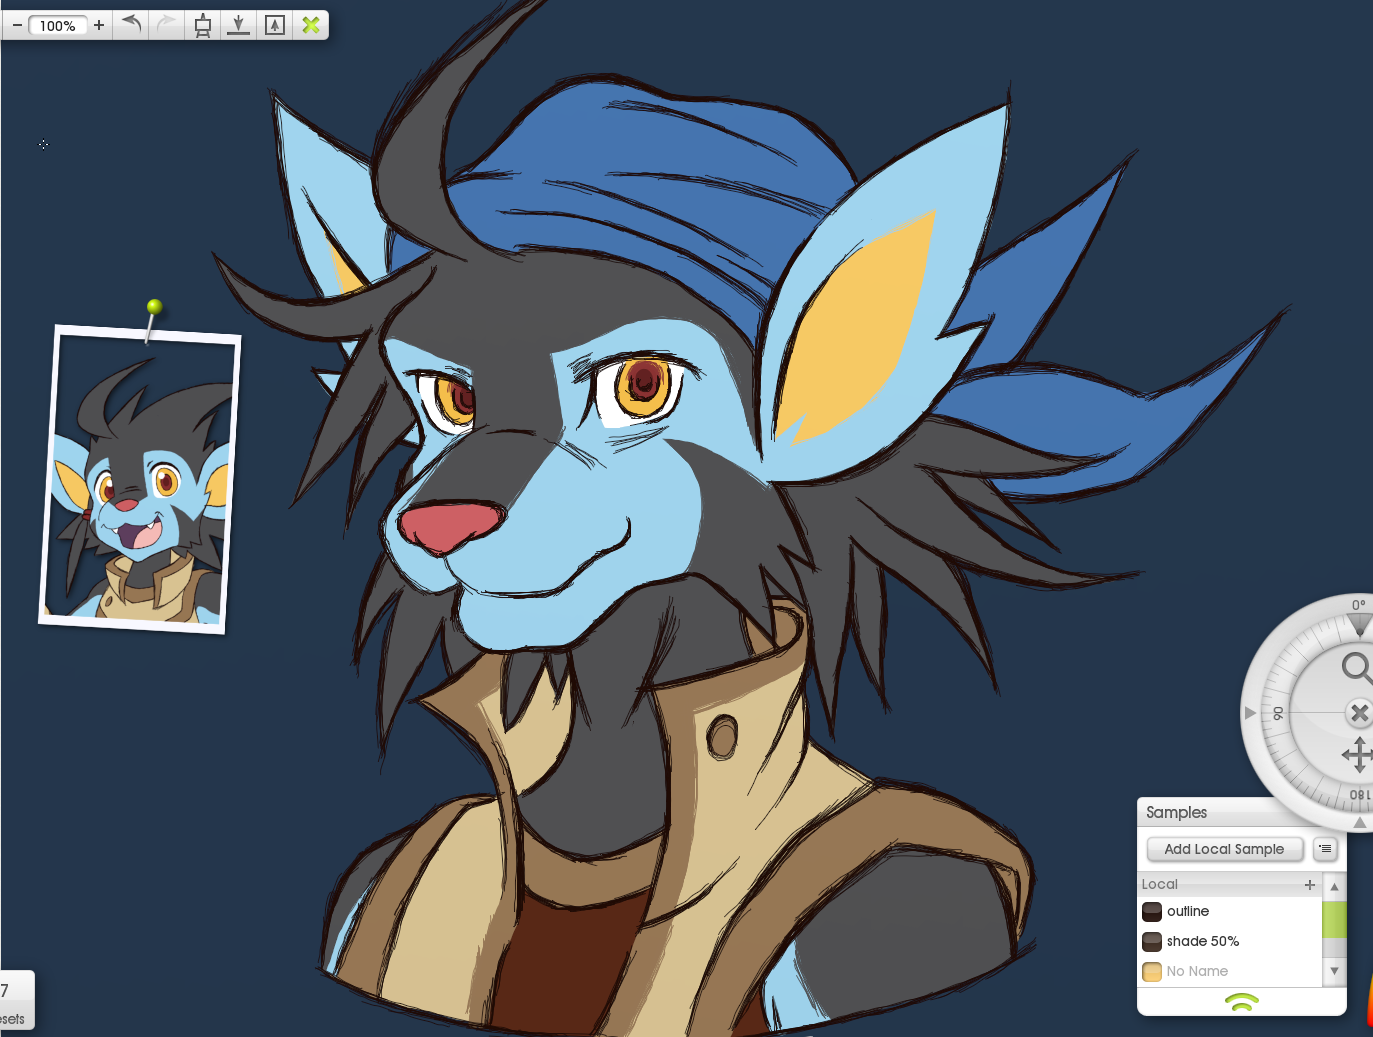
3. This step? Adding the flat colours in. Simple enough.
Well, if you are a traditional type, start filling the DARKEST and COLDEST colours first, then work your way upwards to the BRIGHTEST and WARMEST colours.
...But you have layers to work with! Think with the times Ohgoshdarn!
Leaving the character flat shaded like this is ok for reference sheets.
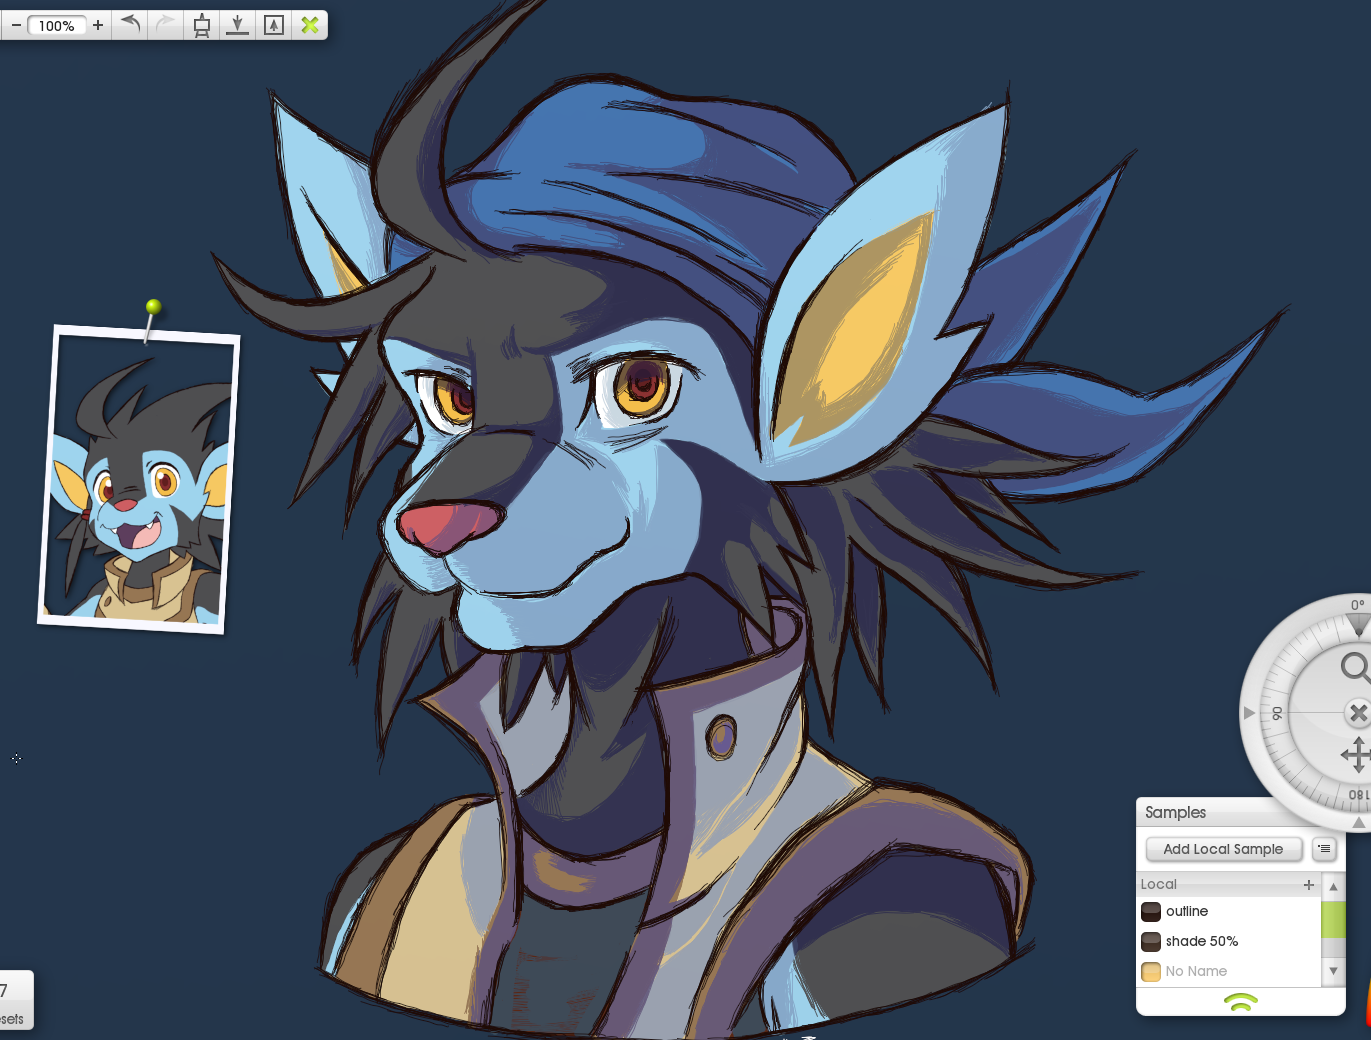
4. Self explanatory, predict/use instinct and determine where you want the shadows to dwell.
One very tempting thing to do here is to use a dark browny colour and setting its opacity to around 50-75%
It works well, very well... but really, it's better to select the palette individually. It makes the overall picture feel 'minty'
Now following what I said before, the choices would still be darker and colder for the shades. I would have stopped here... however...
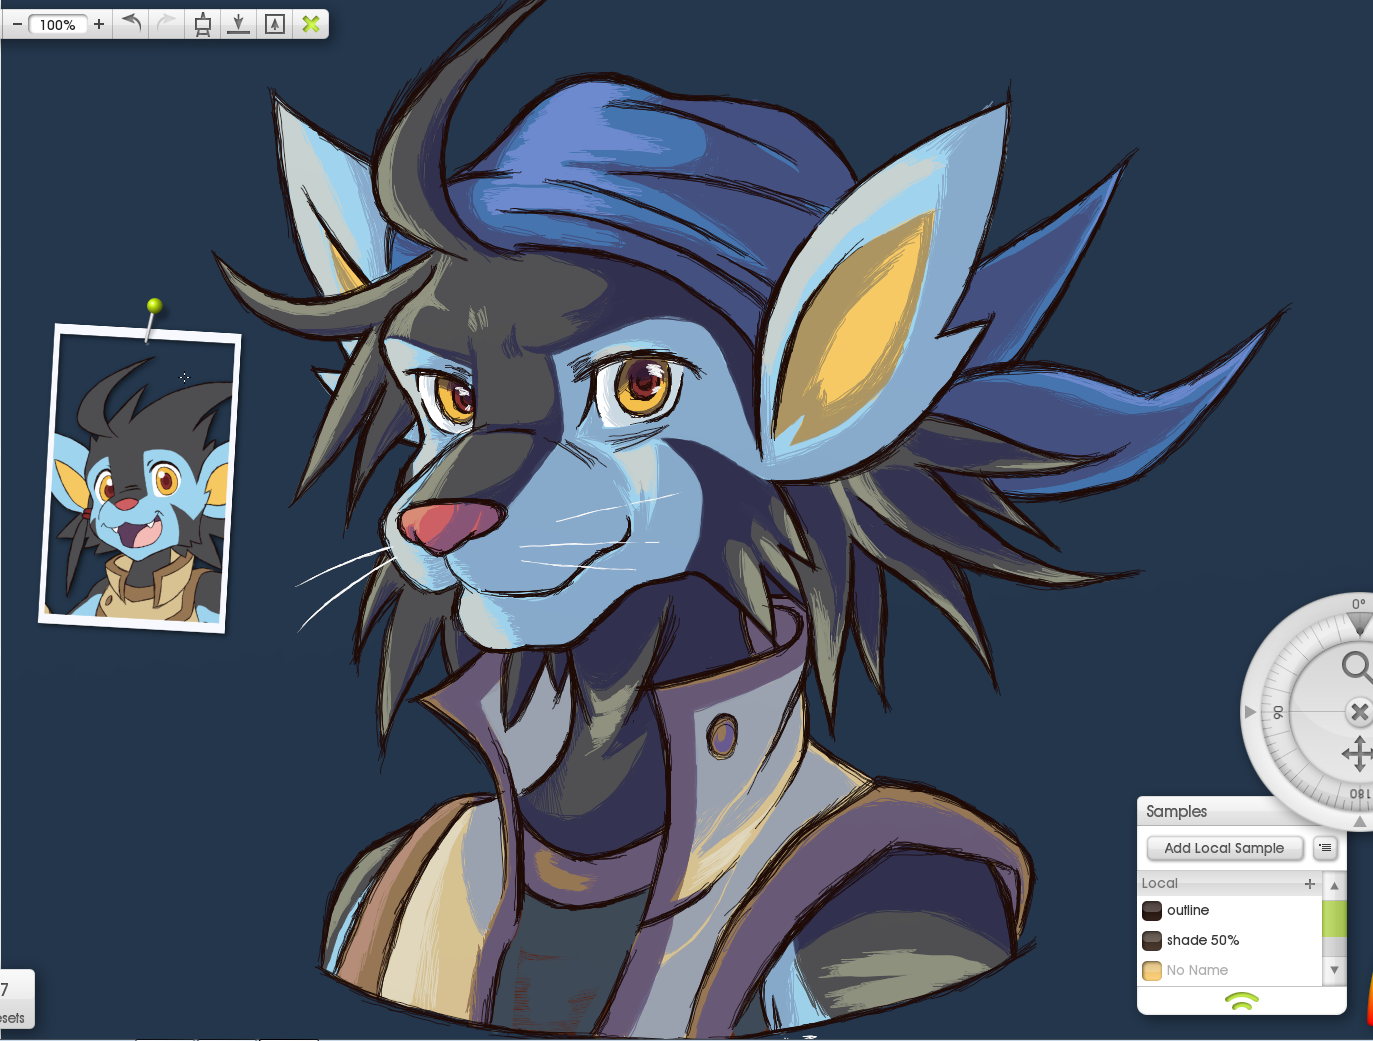
5. The final touch requires some sort of 'reflectivity' on the surface (logical but I have less common sense than an amoeba)
This final part is easy once everything has been all doodled out.
Remember the iris shine and the whiskers? Enable them again, and presto!
Okay, buh-bye!
Now you know my seecrets (but it's really not :L)
I believe it's time I delve into my process of conjuring up nonsense, rather than say nonsense here. But then again, when did I ever write things that make sense?
It's been 8 months! Man I feel old.
1. The first step revolves around getting a sketch done.
Measure this, get that right, rub that out, edit this line in - the list goes on.
This means getting the basic outlines and where everything vaguely sits on the picture.
Shades are optional, but if you have future sight, it's best to line out where the light hits. Knowing myself, I would say I am 'good' enough (Unless I am drawing something that resembles a GUNDAM GEEZUS HAVE YOU TRIED DRAWING ONE OF THOSE?!)
Things to remember - don't bother making this part perfect. If you plan to make this a sketch, by all means, beautify it.
Digitizing on the other hand, it's best to keep it to lines and simple hatchings for shades. Tracing a 75% complete work is not very fun.
2. The second step deals with... you got it; outlines.
What? Some of the lines are missing? Scoff I say! Scoff!
True, I used to outline EVERYTHING imaginable, but that is called being lazy. Colours can also formulate outlines too!
Compare the Rai(mundo) on the left. I did leave the fur untraced, but most of the lines are visible. While this gives a non-coloured piece a nice touch, adding colour in makes some lines unnecessary! I am very guilty of this (because it also saves time
Iris shine and minor details such as whiskers (he has them now, like a real cat) can be slapped on, and you don't need to adjust them until the very end, so disable the visibility.
Things to remember - some lines require thinking in terms of volume. I forgot the rest of the sentence. Sorry.
3. This step? Adding the flat colours in. Simple enough.
Well, if you are a traditional type, start filling the DARKEST and COLDEST colours first, then work your way upwards to the BRIGHTEST and WARMEST colours.
...But you have layers to work with! Think with the times Ohgoshdarn!
Leaving the character flat shaded like this is ok for reference sheets.
4. Self explanatory, predict/use instinct and determine where you want the shadows to dwell.
One very tempting thing to do here is to use a dark browny colour and setting its opacity to around 50-75%
It works well, very well... but really, it's better to select the palette individually. It makes the overall picture feel 'minty'
Now following what I said before, the choices would still be darker and colder for the shades. I would have stopped here... however...
5. The final touch requires some sort of 'reflectivity' on the surface (logical but I have less common sense than an amoeba)
This final part is easy once everything has been all doodled out.
Remember the iris shine and the whiskers? Enable them again, and presto!
Okay, buh-bye!
Now you know my seecrets (but it's really not :L)
Visiting
It has been so long since I stepped back here.
And gone!
Hello thar.
Is me, Jerry. Not ohgosh-whoever-the-fifth. Jerry.
Not to be deep and meaningful, but I feel like this gallery (without the artist in hand) is now good on its own.
What was meant to be a cute little past time spiralled into... this gallery! Amazing and geezus super stars, how it kinda grew.
To the lucranios legion, I thank you all for passing by (and even sticking by) but now it's time to disband!
That is, if there was a legion to begin with ^^; I was a co-founder of one particular group after all (Have I no shaaaaame?!).
To the few that knew me then, remember Miiverse? Man that's only... 600+ days ago! Time flies. I felt l
Yet another devious update.
I feel very, very sad. Mighty number 9 is also very, very sad.
Semester half A has ended but now what?
But here's a recent pic. That will probably not be posted. Like the other pics I said would be. I am so happy that the Hylian shield is a plain old Buckler.
To the one that calls me cosmic power, I hope you like this.
Boop-badoop
Tagged by !Auralphawolf (https://www.deviantart.com/auralphawolf)
Might aswell, it's been a while.
RULES:
0) Open randompokemon.com
1) Switch to "All regions" and "All types"
2) Switch to "1"
3) For each question, generate a Pokemon and use it answer. Then comment about it.
4) PLEASE TAG SOMEONE! This is the only way the meme can get around. (Ravio says eeeerrrrmmmm...)
Ravio Rule) Show some deviance by drawing some of the responses.
QUESTIONS:
1. This is you:
2. This Pokemon is your rival:
3. This Pokemon is deeply in love with you:
4. This Pokemon is stalking you:
5. This Pokemon just stole your cake:
6. This is your lab partner:
7. This is your best friend:
8
© 2014 - 2024 ohgoshdarnthesecond
Comments105
Join the community to add your comment. Already a deviant? Log In
WEEEEELLLLL crap... I still can't draw so........... (I'll leave that to you! XD)